Sunday 8 December 2013

lesson learned


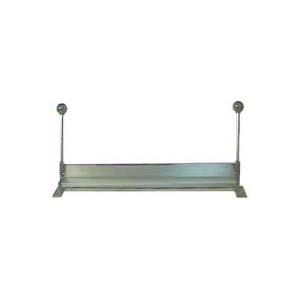
I attended a day of school at the Lee Valley Tools downtown Toronto location. Trevor wanted to take this particular class and suggested that I come along, too. We made a traditional bow saw that uses 12" long, coping-style blades. A basic kit of parts (pins, blades, and plans) is available from Gramercy Tools and the class was taught by Steve Der-Garabedian of Black Walnut Studio. To speed the process, blanks were all pre-cut from quarter-sawn white ash. Nice, straight grain and strong as heck.

(The saw is known as a frame-saw, bow-saw, or turning-saw depending on where you're from)

Steve showed us the basic steps in the fabrication process, all the while ribbing me about the thousandths-of-an-inch precision that machinists are used to - woodworking can be delightfully free of ruler usage if you create part-to-part relationships as you go along. Steve has a very pleasant, easy-going style of instruction; I could see taking another course from him in the future.

A couple of mortises, some matching tenons, a pair of counterbored holes, and a bit of judicious planing later and each of us had a working bow saw that cut surprisingly well. There is room for prettying up the saw's "cheeks", stretcher, and toggle pieces through use of rasps and a spokeshave but it's ready to go as-is. I did spend some in-class time enhancing the toggle (adding a taper, cord notch and finial) as well as relieving the shoulders of the stretcher using a safe-edged file.


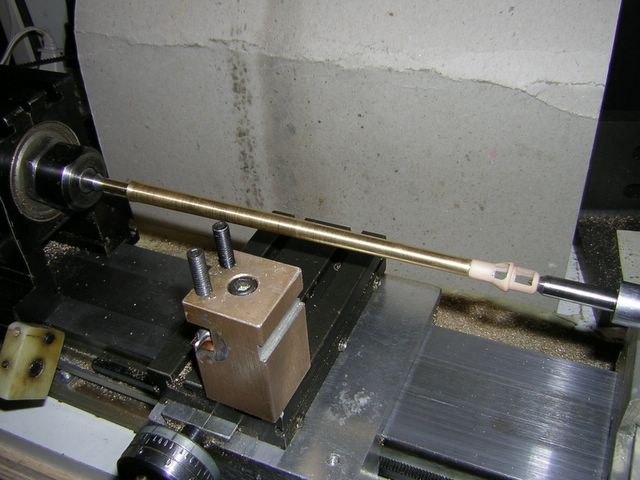
The saw will knock down into something you could pack into a knee sock, useful if you travel or only want one tool box to carry. If you want more choices of TPI and width, custom blades can be made by cutting lengths of bandsaw blades and drilling these for cross-pins. The brass stubs at the end of the blade will be fitted with a pair of turned handles as soon as I can arrange some time on a wood lathe. The blanks are made but there was no lathe available in the classroom yesterday.

I have, in the past, done a variety of woodwork both in school and as required at home. This class allowed me to rediscover some of the aspects of this type of work that I have been missing, and further reinforces my desire to learn even more traditional woodworking techniques.

debunk the junk


In the course of my travels and interactions, I am exposed to many other hobby and craft pursuits. While there are examples of good products and tools available in these areas (some of which are suitable for model railway applications) there is a huge amount of poor quality crap on the shelves. Items that are noisy, badly formed, and lack robustness are everywhere. And, while they are cheaply made, they are not inexpensive. Nothing can ruin your fun faster than using bad tools and bad materials; unless you've also paid a premium price for the item(s).

There is something in the hobbyist jewellery milieu called a "bead spinner". It's meant to simply help you get a whole bunch of glass (or other) beads onto a thread quickly and easily. Every example of this tool I've seen has been either completely half-arsed or so noisy that you can't even think while you're using it.

I made several disparaging comments to the tool user (my better half) about the device(s) she has tried. Understandably, I've been tasked to come up with something better, quieter, and likely to last more than a couple of weeks. You'd think I'd learn to keep my mouth shut but, frankly, I couldn't hear my cartoons over the noise of the last unit.

I've already sourced the major components for a prototype. Just working out some details based on a wish-list of features. The most important items for any spinning device are the bearings, so they were dealt with first...

fellowship


Last weekend was the first gathering of 2012 for one of our local Model Engineers groups. This group was formed by a few experienced machine tool users several years ago to offer a forum for discussion and information sharing, plus a chance for informal social interaction. These meets are always fun and informative.

New and old participants got a good look at recent additions to our host Brian's much modified Taig lathe and his tidy, compact shop. Brian does work of high accuracy and finish, showing that a self-taught machinist can still be a great craftsman. You really have to pay attention to catch some of the subtle features of his projects.

Andrew demonstrated a charming Stirling engine made from soda cans and other recycled materials, powered by a tea-light candle. He showed us plans for this project that can be found on the 'net.

Members of this group have displayed a variety of workpieces and projects at the Kitchener Wood Show for the last few years, and this year will be no exception. We made some plans for who will be at the show and what pieces would be on view. It remains to collect these items and make some provisions for operating any steam models on air pressure (if possible).

Geoff mentioned picking up some Accusize DRO's from a local supplier to fit on his milling machine. Just before this meet concluded, several of us discussed the perennial problem of how to attract new people to this hobby when there are so few avenues left to get access to, and experience on, machine tools in the traditional education streams.

follow me

Despite being a techno-weenie of high standing, I've avoided certain applications of tech purely on principle. For the first time I let a GPS do all the decision making for a trip to a location I had never been before. It is easy to see how this technology could make people into lazy thinkers and poor planners. It is no substitute for knowing how to read a map, however it was very useful at night when I would normally find myself slowing down and squinting at poorly lit, low contrast street signs & house numbers. It really needs a new mounting method, so a small project will be to make up an adjustable bracket for the truck. Not sure if it is best situated on the A-pillar or above the rear-view mirror. Either way, something better than the suction-cup and plastic arm should be developed.

more and less


More of the outside clutter is slated to disappear. Prime among them is a vintage garden tractor project that, while desirable and useful, has simply proved beyond my capabilities. Also exiting is a generously donated riding mower carcass that turned out to have more wrong than right. The latter will go quickly; it's free after all. The former must beckon the right soul to restore it to its former glory. This project vehicle has a number of lusted-after accessories which may be more of a lure than itself.

Progress was also made in the clarity department; I recklessly spent one of the last best days of the season gutting 1/2 the garage to install heavy-duty shelving to organise and gain access. However, it still looks like nothing was actually accomplished. Sad results for a long day of exertion.

I'm forced to wonder what this effort is indicative of. Rather than aging gracefully, I feel rather like an old ringer-washer perched precariously on the edge of a staircase; still mostly functional (and somewhat tough on clothing) but could go any minute, making a hell of a noise in the process. Pushing hard after years at a desk job is not necessarily the smartest course of action. However, I've seen what happens to people who don't, can't, or won't clean up their crapstacks in a timely fashion. It ends up being hell for themselves and those around them. Actions are often taken in an ill-considered panic instead of after measured thought.

There is a movement called The 100 Things Challenge which, at its core, promotes the idea of simplification and reduction. I am not saying that I'll ever get down to 100 things (I doubt that many Westerners would or could, given our culture of rampant acquisition) but I can appreciate and admire the ideal.

Reduce, Refuse, Resist, Reject, Repurpose, Recycle.

negative posting


Spent 1/2 the day removing six posts from the back yard; two were set in concrete. This is on top of the two something-stronger-than-concrete-embedded 4"x4"s already removed. None of these gave any real clue as to their intended purpose. Well, the 4"x4"s might have been used to support a hammock, but it would have been in full sun and usable by no one taller than about 4'6".

Getting the metal posts out seemed like it was going to be a problem; they were sledgehammered in and there was really nothing to grab hold of. I ended up cross-drilling the posts 7/16" and fitting a 4"x3/8" SHCS through the holes. The SHCS was passed through a length of chain, then through the post, the through the chain again. This made a loop of chain for grip. I was intending to borrow my neighbour's 2T engine hoist to extract the posts but, alas, he was away. Two of the posts came straight up with leverage from bent knees under the forearms. Two more came up using the block of cement as a fulcrum for a class 2 lever. The concrete posts required digging out on one side, hauling back-and-forth with the chain, then pulling straight up.

Oddly enough, that's when my neighbour came home. Ah, well - I needed the exercise.

Subsequent to this, four spikes were made from two 8' pieces of re-bar. An angle grinder (thanks, Bill!) halved them nicely. A small sledge formed a hook at one end of each with only one mashed finger to show for it. These spikes were then shoved and pounded obliquely into the ground at each corner of the gazebo frame. Often the winds whip through this area with some speed. The piddling 6" toothpicks provided with the gazebo would offer no resistance to anything stronger than a cool breeze.

(A strong, late Autumn beeze did buckle the horizontal members. These will have to be replaced)

surprising service


I recently had occasion to order a couple of hardcover books via Alibris. I chose the vendor a) because the price was reasonable, and b) because they were in Canada so there would be no Customs clearance fee. Shortly after agreeing to the price I was contacted asking for extra funds to cover the shipping; it seems the quoted price was for a single volume. I must admit feeling a little put out by this request but, as the total cost was still going to be reasonable, I agreed.

The package that arrived (swiftly, I might add) was excruciatingly well packed. I immediately realised that this vendor really cares about the handling of books. Each volume was crisply wrapped in its own kraft paper sheath, and the pair were swathed in heavy duty plastic film. The shipping box fitted the volumes without slop and was heavy enough to pad the corners against all but the most serious impact.

The vendor is Burton Lysecki Books, of Winnipeg. If I ever get out that way, you can rest assured that this is THE place I will stop and visit.

to cure the obscure

I picked up a bigger drill press (than my 8" Delta 11-951) as part of a job-lot of machine tools. It's a solidly built, Yamaguchi YD-350A bench top model that was actually made in Japan, with all signage lettered in English, which I'm guessing dates from about 1950. It has just 3 speeds but runs without vibration. The problem I found was the chuck runout was about .030" (measured via a dial indicator at the end of a 5" length of 3/8" drill blank). Removing the chuck from the spindle revealed that it had obviously spun out at some point, as the male and female J6 tapers were both badly scored and galled. I was able to clean up the spindle taper and read ~.0005" runout on it alone. The female taper in the chuck body, however, is proving more difficult to correct. Using a d-bit as a scraper, I was able to remove most of the raised burrs on the inside. With the chuck fitted back on the spindle, the runout was now on the order of .010"; not bad for woodworking but miserable for metal. Since I don't know how accurately the chuck ran prior to the spinout, I can't say whether this is the best it will ever be. I'm digging around for a 'known good' chuck to try for better results. If it can reach .001", I'll be more than happy.

bang up job


Having blown the connecting rod out the side of my 11HP garden tractor I decided that I'd undertake a motor swap. The noise associated with the rod leaving the block at speed was considerable. Luckily, a piece of garden furniture was the only casualty caused by the flying starter motor. The fact that I have little to no experience with infernal combustion engines should deter me from this repair, but the sensible approach seems to elude me lately.

An almost identical (used) motor in running condition has been found locally and brought home. I was told to drop the carburetor bowl, clean any gunk out, replace the pan gasket, drain & fill the oil, and make sure that mice hadn't made a nest in the head cooling fins under the shroud. Most of these tasks were completed this evening.

First, however, I undertook to remove the existing motor from the chassis. The remaining oil was drained (frankly, it seemed like a lot to me) and I managed to figure out where the bolt heads were underneath the frame to free the block. Somehow I kept my wits about me and didn't try to hacksaw the pulley assembly off the drive shaft when no visible means of attachment was evident. There was, in fact, a recessed bolt to remove the pulleys.

In the process of all this I determined that the motor in the tractor a) was not the original motor, and b) had a carburetor and throttle plate from the 12HP version from the same manufacturer. The replacement motor has a different throttle motion with integral choke actuation. With any luck the existing throttle cable will have sufficient range of motion to do the job.

The wee beastie sans propulsion unit:


getting a handle


In the process of setting up and testing the newly acquired lathe:


I went ahead and turned some aluminium pieces to repair a useful but poorly made rolling cart. The plastic handle had cracked where it met the telescoping tubes coming out of the body of the cart itself. The plugs are 1/2" diameter, 1-3/4" long blanks sawn off a rod, faced, drilled & tapped 1/4-20. They are cross-drilled and tapped 10-24 to re-attach to the tubes. The handle is a wooden dowel shaped on a disc sander and counterbored to accept the plugs. 1/4-20 countersunk bolts were used to connect the plugs to the handle. Since everything fits, I can take it apart to polish the aluminium and varnish the wood.


the best laid plans...


...are apt to go astray.

Things are not as they should be, but they are tolerable for the moment. The pursuit of things train-like is on hold while domestic chores take their place at the top of the "to do" list.

Managing the property is consuming more time than planned, mostly due to several unexpected situations that manifested all at once. Solicitor Murphy will have his little jests. Getting over the latest batch of hurdles will take a bit more effort.

On the shop front; there is actually a shop space. It is a little jumbled at the moment, but I have successfully assembled the drill press and put it to use punching a number of 3/8" holes in an 18" length of 1/2" x 2" mild steel for a rototiller "digging bar" (wish I knew what it was actually called). I was also able to add some fore-aft stays to the arches of a garden arbour by cross-drilling two lengths of 1/4" steel rod and fastening it all together with some washers and cotter pins. A bit more like blacksmithing than machining, but you have to start somewhere.

It looks like there will be space for all of my machine tools, however, room for an indoor layout will not be available for some time :-(

pack mule


It's long past time for a change. This means departing the current residence and finding something more appropriate for an inveterate tinkerer and budding gardener.

The unfortunate side effect is that virtually every tool, except those suitable for domestic renovations, is packed away out of reach. This has been going on for long enough to cause withdrawal symptoms to kick in. Patching gypsum board, replacing electrical fixtures, and fitting trim around non-90° angles, is not an effective substitute for "proper" fabrication.

Subject to all basic requirements of a new home being met, the #1 priority for the new location is a proper workshop. The #2 priority is a good kitchen layout. Somewhere in there will be a library/reading room, a home cinema, and a place to sleep.

As far as a workshop goes, I'll actually need two. It is anticipated that many fabrication jobs will have to be undertaken to improve the new house. A good number of bespoke cabinets, shelves, and other wood furnishings will need to be designed and built. Experience has shown that woodworking and metalworking tools do not live well in the same space. Reference material has been gathered and sketches are under way to plan best use of expected available spaces (single car garage, basement room, shed, etc.)

(note: I got one workshop, which isn't big enough for either pursuit. The kitchen is likewise poor. Never mind the other problems :-) )

donning the goggles


Maybe I've been asleep; I missed the beginning of this whole movement. It's called Steampunk, and it's amazing what's being achieved by its enthusiasts. The only way I can describe it is "Victorian aesthetics" meets "high tech" meets "steam power". Maybe if Jules Verne's ideas had become reality within his own lifetime...

Check out the Projects section on the Steampunk Workshop blog. These objects appeal to me in a manner which I'm finding very difficult to come to grips with. There just aren't enough hours in the day to delve into all of the fascinating aspects of creative pursuit.

Also look into Brass Googles and Crabfu SteamWorks to see other examples of the genre.

peg leg


I've now managed to adjust the mill in a satisfactory manner. Not perfect, but adequate to task for the time being.

Started in on the current project; it's for an MV Agusta F4. I need to fit the footpeg from a 750cc model to a 1000cc model (again, don't ask). The 750 peg is wider, so it has to be milled down on either side. Trouble is, it's shaped like a banana. Coming up with a safe way to hold it during milling was interesting. I thought of a dozen bizarre and overly complicated approaches until finally settling on this:


It seems so simple in retrospect.

Cuts were .005" per pass, and the material came off in little shavings, but floated around like powder. Had to take a little over .030" off each side. Not sure what the alloying elements are, except that I was assured "no magnesium". The thinned 'peg fit nicely into the intended bracket width, except that the inboard radius is too large to admit the pin:


Must now mount the rotary table (finally, an excuse to use it) and come up with another, hopefully elegant, way to hold the 'peg securely while reducing the radius. Only the simple fabrication of a pin remains after that.

now what?


The column is now vertical (within acceptable limits).
- DTI held in headstock via collet, tramming up & down a right-angle (1-2-3 block) sitting on table.
The dovetail mount is parallel to the Z-axis travel.
- DTI held on table, clocking off bearing face of dovetail
The ER16 headstock is clamped to the dovetail and the vertical (fixed) face of the headstock body is parallel with the Z-axis.
- DTI held on table, clocking off fixed face of headstock body.

However, the spindle axis does not appear to be parallel with the Z-axis.

When sweeping the table with the DTI over a 10" radius, a difference of .006" is registered between the tops of the 1-2-3 blocks on each side of the table.

Possible sources of the error:
- ER16 spindle ball-bearing bores not parallel to bearing face of dovetail
- dovetail mount not true
- buildup of measuring errors

A 5/16" piece of drill rod through a collet gave visual indication that the spindle was, indeed, slightly off vertical compared to a square on the table itself.

The whole purpose of the tramming the mill is to ensure that the cutter is running truly and the headstock moves accurately with respect to all axes of traverse.

A simple expedient to deal with this last error is to snug up the dovetail mount cap screws and tweak the headstock while sweeping the table, then re-tighten the cap screws. Luckily the SHCS's are accessible with the headstock mounted.

Should be OK to go ahead and re-mount the motor and start cutting again, but these errors and faults will all need proper correction (possibly through re-machining or grinding) at some later stage in the game...

here we go a-trammelling


I've spent some time re-tramming my Taig 2019CR mill. So far it remains unconverted to CNC. Well, I never said my time management was anything to be proud of.

It is critically important to get the vertical column ways (Z-axis) dead square to the table surface (X-axis) and, at the same time, get the spindle centreline parallel to the Z-axis travel. All sorts of odd errors creep into one's workpieces if the latter is missed; the most prevalent being a dished surface when flycutting during an X-axis traverse.

Similarly, the Z-axis ways must be square to the table surface (Y-axis) otherwise more unwanted errors creep in. This goal is harder to achieve due to the the Taig's column-to-base design. Suffice to say some shimming can be necessary if adjustment is required. Make sure the mating faces of the column and base are scrupulously clean before assembly.

My column is tipped backwards at ~.001" in 3" slope. Due to workspace constraints, I cannot readily correct this fault. This will manifest itself as a small positional error when moving the spindle downwards over long distances. Since the Z-axis is limited to 6" of travel, this effect should not prove too great an inconvenience. However, it can also generate a ridge in the milled surface (along the X-axis) when surfacing with a large radius cutter. Since inserion of the shim to correct the front-to-back error would disturb the current side-to-side setting (error ~.00025" in 3") , I will forego the adjustment for a short time.

I have read online forums that suggest shimming under the spindle mount dovetail to correct the error. This will address the "ridging" problem, but not the positional error created by Z-axis downfeed.

the lucky coin has two sides


Sometimes you get lucky. I was recently able to acquire a 1952 vintage Myford ML7 lathe. It is in good shape for its age, but still requires some TLC before returning to active service. The lathe came with many accessories that were purchased by the original owner. generic ML7 info

(note: the entire machine had been greased instead of oiled - this proved to be a problem and the machine was shelved until space and time permit a full teardown)

Once I move into a larger workspace, the lathe will be set up and put to use. It has several advantages over the Taig lathe (small size is NOT one of them) including self-act longitudinal feed, screwcutting via changegears, and a geared headstock capable of low RPM parting & turning.

Model-specific reference texts were obtained from Camden Miniature Steam Services and the requisite English-spec gauges, taps, & dies from RDG Tools in the UK. Service was excellent from both vendors.

level 8 complete


Finished the final practical course for my Machining programme today (note: 09-Dec-2007, almost exactly 6 years ago today). While it's a bit of a relief, I'll miss having access to the large equipment. Only classroom work is left to complete in order to obtain the certificate.

Shown here is the mini arbour press from Level 7 of course. I'll be using it to fit wheels and gears onto axles of various railway models. I spent more time than strictly necessary on this project because I know I'll be making frequent use of it.

In general, the programme content was fairly good. In addition to both rudimentary and more advanced threading exercises we created a tap handle, C-clamp, screw jack, DTI holder for a 2" quill, v-block with horseshoe & strap clamps, and a 5" sine bar.


I'd like to have seen some specific projects in the early stages, like a machinist's hammer + prick punch + centre punch set, plus a scribing block & engineering scale holder for use on the surface plates. These items would serve as the introduction to basic turning, knurling, milling, heat treatment, and surface grinding; these basic tools would then be used throughout the rest of the course.

Through the programme we've made use of surface grinders, lathes, vertical & horizontal mills, drill presses, bandsaws, and off-hand grinders. Some of our workpieces were case hardened by the school staff - with varying degrees of success. As the machines are in use 6 or 7 days per week, they see a significant amount of wear and tear. It was once said that if one could manage to complete their assignments satisfactorily using these devices, working effectivly in the real world shouldn't be a problem.

getting ahead(stock)


I finally bought the new ER16 spindle for the Taig mill from Carter Tools. Shipping was fast & trouble free, and the service was great as usual.


The 3/8" endmill holder I was using before (which screwed on to the spindle nose thread) had close to .0015" of total runout on its best days. Measuring the runout on my best 3/8" shank endmill held in the ER16 collet with an Interapid DTI showed less than 1/4 of a thou of deflection (.00025"). This makes for better than a 500% improvement in accuracy; I feel that this upgrade is well worth the money spent.

taking a brake


Well, the cost of brass bar stock has certainly gone up since the last time I replenished my supply. The bill came as quite a shock when it was totalled up during a recent trip to the local Metal Supermarket outlet. Free machining yellow brass was available in many cross-sections, but no bronze (either oilite or aluminium-bronze) was on hand for bearing material or pistons. Still, it's hard to work on your projects without the proper raw stock...

Busy Bee Tools was having another sale, so I picked up one of their 18" wide sheet metal brakes for about $20 CAD. It has no "box-and-pan" capabilities, but I suspect that a few fingers can be made of mild steel to aid in the forming of some small enclosures and trays. First order of business will be to box up the new drive for the lathe...


Lindsay Books (who has retired and no longer offers their wonderful selection of titles) had two apparently worthwhile books on sheetmetal forming. "Sheet Metal Technology" and "Working Sheet Metal", both by Dave Gingery. These would probably be worthwhile additions to the average tinkerer's library. I had purchased "Building your own Plastic Injection Molding Machine", "Build a Power Hacksaw with Vise" and "Uncle Dave's Shop Notebook" and find them to be excellent instructional material; well worth the price.

model engineering terms


I've created a cross-reference table of terms that I've come across in older textbooks and tutorials that were written by British authors. The table provides a North American equivalent term or phrase where possible.

So, if you don't know what a "Mole wrench" is, see my Current Projects page for this reference. I will try to update it when new information comes to light.

lots and none at all


Progress? Not much despite what seems to be continuous activity on my part. More like swimming upstream or running in place. It may be that this is a function of summer weather and the desire to be outside.

I have hopefully solved a temperature problem with the new 90VDC treadmill motor powering the micro lathe headstock; it was getting very warm using the PWM drive controller. I've mounted a 110VAC fan so that it blows directly along the motor's axis, and added some swarf guards to prevent chips from flying onto the floor at the workshop doorway. I will need to add a "tunnel" shroud over the motor itself to prevent chip entry. At some point I will buy a better motor, but the torque of this one is more than sufficient to handle any job I can hold in this lathe.

The KBIC-120 motor controller, barrier terminal & wiring kit, fuses, and giant heatsink were purchased at Canadian Drives in Concord, ON. The staff there were extremely helpful. Now that I've verified functionality, I need to build an enclosure for the drive controller itself; too many exposed electrical terminals for my taste.

extra curricular activities


Luckily I've finished both assignments for the current machinist course ahead of time. Doing so allows me to pursue some small projects of my own. Today I managed to get a good start on some much-needed accessories for the home shop, and do a little side job for a friend.


A small jack for supporting work on the micro-mill (1 of 4 made). The material is 3/4"(atf) 12L14 steel fitted with a 10:32 SHCS. A ball bearing will be pressed into the socket, and the head will be cross drilled for a small tommy bar. The blank "nut" to the right will be made into a miniature c-clamp (set of 4) using a 6:32 or 4:40 screw .


Spacers for the front caliper mount on a Ducati racing bike. These had to be thinned by 50% when a larger brake assembly was purchased. None of the local machine shops would touch this simple task.

Sunday 1 December 2013

The bitterness of poor quality...

...remains long after the sweetness of low price is forgotten.

With respect to a tap & die set from Mastercraft (Canadian Tire).
It would be more aptly referred to as a crap & cry set.
The description "tool-shaped objects" would fit this collection of motley misfits.
Not a single item is without some minor (!) defect in the design or making thereof.

The whole concept of a "set" of things must have been hatched by angry marketers.
Angry at the world, and determined to take their revenge upon it.
"Lets put a bunch of low-quality-crap-we-ordered-while-drunk and things-we-got-suckered-into-stocking-thousands-of into a pretty box and tell the masses they're saving money by buying a 'set' of tools!"

Buy only the pieces you need, when you need them.
Buy the best quality you can afford, even if it hurts a little.

You will always regret being inappropriately frugal when what money you've spent doesn't get the job done.

If you've had to buy the same tool twice, you didn't spend enough the first time.

Monday 25 November 2013

school shop projects

Assignments for Level 3 and 4 of the (now defunct) Precision Machining programme at Sheridan College STC included a fairly large tap handle, a machinist's jack for supporting milling jobs, and a 5" sine bar.

The jack is far too large to use on the Taig mill, but it was still an interesting project involving tapers, knurling, threading and cross-drilling the cylindrical parts.

As the school did not have proper facilities available for hardening, I will (eventually) be milling off the top of the conical jack post and press fitting a ball-bearing into an axial hole therein.

In an attempt to keep the working surfaces of the sine bar from wear and, as the quality of the steel we used was fairly poor, I had the sine bar plasma (ion) nitrided by a friend. The ground surface finish became matte, but it has not corroded or otherwise degraded since being made several years ago.

I would like to upgrade the rollers on the sine bar, as mine were turned rather than ground (the shop's cylindrical grinder was out-of-order during the assignment), however I am in negotiations to obtain both a 3" and 5" bar soon. I can use the energy and time doing something else.

variable speed headstock


Finally got around to converting my headstock to variable speed DC control. The Taig lathe comes equipped with a set of 6-step pulleys intended to be run from a ~1550 RPM AC motor. This gave speeds of 525, 825, 1300, 2100, 3350 and 5300 RPM.

The new variable speed drive will allow 0-5000 RPM operation, with simple current limiting and load compensation adjustments. Under load (when cutting), the controller will increase power to the motor in an attempt to keep the revs constant.

The drive is from KB Electronics (model KBIC-120) with the auxiliary heatsink and barrier/fuse accessory kits; good for 1HP and 12A. The motor is only 5.8A and .40HP so there's lots of margin in the system. At some point I may upgrade to a shunt wound motor from the brushed permanent magnet unit.

The control was purchased from Canadian Drives Inc. who gave great advice.

finish it redux


I re-treated the workpiece by using fine steel wool to rub in more of the bluing. This evened out the appearance, but it would require several more applications with the somewhat abrasive wool to achieve a really deep colouration.

In a document that I was reading about cold bluing, one user recommended a 10-time repetition of immersing the workpiece in boiling water, application of bluing with steel wool, rinsing & drying. That seemed a little excessive, but probably works.

An assumption I made at the bleaching phase was to use liquid chlorine bleach which had an interesting reaction with the aluminium pan I had the workpiece resting in. A yellowish deposit formed wherever the bleach was in contact with the pan. I did not consider using peroxide bleach until I saw a bottle in the drug store the other day. It bears some further experimentation.

One of the other tests I'd like to undertake is to try to apply a copper-based patina available at art-glass supply shops. That would provide a nice contrast to the dark blue on certain projects. How it will work with steel is a mystery at the moment, as it is designed for use with lead came in stained glass applications.

oddity 3


The latest oddity is boring out a plastic plumbing fitting to accept a brass drain fixture for a sailboat. Seems that, in the winter, the contents of the flexible drain pipes freeze and pop off the brass fixtures. The new plastic fittings are barbed, and so should hold the flexible pipe more securely when used in conjunction with screw-type pipe clamps.

I am somewhat concerned about the differentials in expansion co-efficients of the plastic and brass. Since they will expand/contract at different rates, I bored the plastic fittings slightly oversize to allow for the use of flexible silicone as an adhesive.

The job forced me to create a mandrel out of thick wall PVC tubing to hold the plastic fittings. What was really needed was a core inside the tube/mandrel to keep it from distorting in the 4-jaw chuck. As it was, the white (possibly nylon?), plumbing fittings had the most annoying habit of peeling off thin sheets from the interior which would wrap around the boring bar and threaten to rip the whole assembly out of the chuck. The grey PVC would generate wispy strands that would either float around or ball up at the tip of the cutting tool.

another odd one (part 2)


The barrel turned out OK. I did discover a problem with the live centre. The centre deflects a lot when you apply any sideways pressure to the workpiece. Not good at all. It looks like it may have been ill-used by the previous owner.

The deflection resulted in excessive chattering and forced me to take very fine cuts at very slow feeds. A bit of a pain on a 5" workpiece that needed .100" taken off the narrow end. At least it's good practice for technique.

The breech end was flared using a file, and the chatter marks were removed using the same method. The application of a fine waterpaper under rotation gave a matte finish to the workpiece. I was able to re-use the muzzle brake portion of the casting and simply slipped it over the cylinder I turned at the narrow end. This is held in place using Zap-a-Gap thin ACC.

I'm going to have to make a new live centre. Luckily I recently purchased "The Amateur's Lathe" by L.H. Sparey; which has a suitable drawing of a live centre with two hefty ball races. I may have to scale it a bit, as I believe it was intended for a Myford 7 or 10.

another odd one (part 1)


Well, this must be the season of oddities.

This project is a 1:35 Tiger tank barrel. A friend of mine is assembling the model, and found that the kit contents included a badly warped barrel casting. Rather than do the sensible thing and request a replacement from the manufacturer, I said I'd give it a shot.

I found a piece of brass rod of suitable diameter and cut it a little over length with a hacksaw. The saw has a cobalt blade which will even handle O-1 drill rod (my dream shop includes a metal-cutting bandsaw).

Brass might be a little heavy for this application, but I really want to get better acquainted with its idiosyncrasies. A bit of PVC or ABS would work just as well.

Thanks to the bored-out spindle, the 3/8" diameter rod slipped right into the headstock for facing and turning the small diameter at the breech end. I'm using a brazed carbide tool that produces a good finish at about 1300 RPM.

The barrel is tapered, so the tailstock will have to be offset to achieve this. Also, the muzzle brake is a fairly complex shape, but that portion of the casting seems in good condition. I will simply remove the cast muzzle brake, drill out the end and press it on to the new barrel.

I'd like to do the taper turning between centres, so I've chopped off a piece of drill rod and fitted it into one of the collets. Using the carbide tool in the topslide set at 30º, I turned the drill rod into a dead centre. I have fitted the spring loaded, ball-bearing live centre into the tailstock. It remains to make a small dog for the headstock to drive the barrel, and calculate the tailstock offset to create the taper AFTER I've turned the small diameter for the brake at the muzzle end.

finish it


Some interesting experiments in surface finishing this weekend. I had picked up some gun bluing from the local "outdoor" store. I treated some small steel blocks and they turned out fairly well, if a little "splotchy" in places. I felt that it was possible to achieve a higher finish quality.

I asked some local experts and, as expected, received varying advice. Procedures for cold bluing differ due to personal preference and chemical composition of the bluing itself. There are some blues which are simply not available in Canada due to import restrictions or other Customs complications.

The basic premise is to provide a finish that resists corrosion. Old-school techniques like heating the steel to a certain colour and plunging the workpiece into a bath of motor oil are fine if you have a proper place to do that kind of work.

I did manage to achieve an "oily water" finish that is interesting if not wholly intentional. Initial research into the various processes opens up a fascinating range of possibilities for future projects. It's certainly a non-trivial subject.

an odd task


Quite a while ago, a friend asked me to swap the stem out on a pipe that he had. He wanted the stem off his favourite pipe transferred over to a new bowl. I did once have a penchant for pipe smoking. Loved to sit back, draw on some dark, cherry scented tobacco and watch re-runs of the late Jeremy Brett playing the great Sherlock Holmes. I've long since given up smoking, but packed away somewhere in a long-mislaid box sits my favourite pipe...

Anyway, the project was always at the back of my mind. I finally got around to looking at it seriously. I found to my dismay that the stem would not fit in the micro-lathe as planned. Too wide for the spindle bore at the mouth-piece; not good.

The first order of business was to lop off a piece of the barrel to bring it in line with the overall length. A razor saw made short work of this. Next was to bore out the stem to the diameter of the bowl connector. The "old favourite" was not designed for inline filters, so it had quite a small diameter interior.

I decided that the drill press was the only way I was going to get the stem bored out with the lathe being unsuitable. I gradually stepped up the diameter of drills until I managed a tight slip-fit over the connecting tube. Sounds easy, but whatever material the stem was made from did not like to be drilled. It screached and wailed. It grabbed the drill bits and stuck them fast. Beeswax was no help, either.

Suffice to say that I did manage it, but at the expense of a few scratches on the stem. Some 400 and 600 wet paper and the Dremel polishing wheels thankfully removed the marks. I was originally going to shave the outer diameter of the stem down a fraction to match the bowl's stub diameter, but I was concerned with the way the material reacted to the drills. I visualised large flakes of "whatnot" breaking off and ruining the outer surface.


It's done and it's functional. It even sits nicely in the hand. Not the sort of task I had envisioned when I took up the machining vocation, but a good learning experience, nonetheless.

cutting up


Good thing this was just a 'little' project. Mind you, I've gotten tired of kludging a solution together at the last minute to get a task done. I have been meaning to complete a number of small jobs to provide more jigs and clamping fixtures. One of the most vexxing aspects of machining is simply figuring out how to hold the workpiece! Having access to the large machines with their myriad accessories has allowed me to let these seemingly insignificant (but necessary) jobs slide.

done:
- clamps for the good vise
- new arbor for a larger diameter slitting saw
- collet bored out for DTI mounting peg
- a pair of 1-2-3 blocks

to do:
- more t-nuts (Many, many more. They're like potato chips. Can't have just one.)
- strap clamps (Three sets of step blocks are on-hand.)
- cam lock clamps
- small sine bar
- new clamps for the good vise (I've thought of some design improvements.)

I have suspected that there is a slight mis-alignment of the Z-axis on my mini mill; along the Y plane rather than the X. The slitting was imperfect, but I will (for the moment) attribute the results to using three blades of different thicknesses on two different arbors. Some of my tooling is, alas, second hand and of unknown quality; but you have to start somewhere.

I have obtained a Y-axis extension kit with an excellent set of tramming instructions from Wildhorse Innovations so this should help with proper setup and usefully increase the working range of the mill table.

the domino effect


It never fails. You try to get some work done and you realise that there's something else you need to complete first.

My workshop, for instance, has been largely buried under excess flotsam and jetsam for quite some time. I wanted to do more work at home so an off-site storage space was obtained to clear everything out. The relocation proceeds apace, meanwhile I am puttering around with some odd jobs.

I simply wanted to chop out a section of a piece of mild steel. No problem; just mount the slitting saw on its arbor, clamp the workpiece in the vise and cut away. Wait, that saw won't make it all the way through the steel; it's too small in diameter. Fine, get a bigger saw. Whoops, that saw has a larger mounting hole so it would mean making a different arbor. OK - just use the original saw and cut twice (back and front). Hold on - the jaws on that el-cheapo vise aren't square. Hey - why don't you use the really nice little toolmaker's vise from Sowa Tool & Machine? Because you never bothered to make the little clamps to mount it to the milling table!

That is how I came to spend this afternoon making little mounting clamps for a vise instead of cutting a piece of mild steel as I had originally planned. And, in the process, I discovered that the 3/8" endmill holder that came with the mill does not grip endmills properly. The set screw is too small so the endmill works loose. Tomorrow morning will be spent sorting that issue out. I may even get around to cutting that piece of mild steel.

The upside of it all is that I finally have the pesky little clamps made, enabling me to make use of the nice vise, instead of staring at it on the shelf.

great accessory

A 4" tilting rotary table, available from Busy Bee Tools. I was lucky enough to receive one of these as a gift. Though small, it will prove a capable addition to the Taig mill. 

Model Engineers Workshop  issue #111 has an article on generating ball handles using a rotary table and boring head on the mill. The tilt feature of this table will save having to angle the milling head itself.

Sunday 24 November 2013

amateur? not as such.


I regularly attend meetings of the local "amateur" machinists group. The quality of the stuff they produce is truly phenomenal. It's akin to joining the local amateur operatic society because you belt out "Carmen" in the shower and finding out that Andrea Bocelli is the first singer for the evening.

Frankly, it's a bit embarrassing to show what I've done re: the indexing head for the Taig and a few other minor efforts. Still, it is an inspiring and motivating experience. Each time I go I learn some other tidbit of information that is helpful in fabrication. Some of these guys are real artisans, and they love to share their techniques and tips.

A few of them have attended the N.A.M.E.S. event in Michigan. They report that lots of good bargains are to be had, and a tremendous number of fabulously detailed models are on display.

I remain surprised that there are no local shows of this nature, given the population density and cross-section of interests. The closest Canadian show of similar magnitude is the annual EMES event in Estevan, Saskatchewan. At 1500 miles distance, it won't be one I'm driving to next fall.

divide and conquer


A simple indexing plate for the Taig. It has both 20 and 24 hole circles, yielding 2, 3, 4, 5, 6, 8, 10, 12, 20, and 24 divisions. In this photo, it still needs a locking pin mounted to the T-slots in the headstock.

The plate was made on a large milling machine using a dividing head. Sure, I could have done it the hard way by dividing the circumference of the disc into equal parts, but I had access to the big machine and the head. Dad always said I was good at "energy conservation".

Ran into some difficulties getting the first plate (I made more than one try, yes) concentric on the darned pulley. After several head scratching moments, I discovered that the stepped shoulders on the original mandrel I made up were not concentric. A new mandrel solved the problem.

The plate is held on the pulley using three 1/4"-20 flat head Allen bolts, countersunk into the pulley back. I have two spare plates in case I need other divisions, like 7 or 13, for some future project.

I could've sworn I'd made the pulley with 24 and 25 holes in case I needed to make up some sort of micro-adjustable feature using a 40 tpi thread at the 25 div option. Those spare plates will come in handy...

planned projects

Looking back, I note that there are several things that were planned to be done but have (so far) remained unaccomplished. I'll collect them here for reference going forward:

  • CNC conversion for the Taig mill
  • T-nuts for the Taig mill           <- actually, these nearly complete
  • Sine bar for the Taig mill        <- in negoatiations to obtain both a 3" and 5" unit
  • Cam-lock clamps for the Taig mill
  • Dremel toolpost for the Taig lathe

Saturday 23 November 2013

2nd life

Taig micro-lathe on its second owner (me). The headstock spindle is bored out to over .375" to accept larger diameter rods. Rear toolpost is a Taig part bought at Lee Valley Tools.

Planned upgrades include a micrometer set-over tailstock, toolpost for a Dremel handpiece, and a longitudinal carriage feed. An indexing plate (20 and 25 holes) is completed and has been installed on the headstock pulley. In use, a block is attached to the top of the headstock and a pin manually engages each index hole in turn.

I must remember to create a rear mounted toolpost for a parting blade. I've been using thinly ground toolbits in the front post simply because I could not find a suitably thin blade for this small machine. I certainly don't want to create twice as much waste in the parting as I do for a small turning...

The micrometer stop has proved unaccepable, as the axis of thrust from the carriage is not along the stop rod; it flexes too much to count on its accuracy. Something else will be done in its place.

scratcher

Picked up a fibreglass sanding pen at Canadian Tire. Does wonders polishing up brass sheet. The makers are serious about wearing gloves and eye-protection when using it; tiny shards of fibreglass break off as the tool is scrubbed back and forth. Naturally they head straight for your eyes and unprotected skin. Keep your pets away from your work area and clean up after yourself.

dream machine


A snap of my Taig 2019CR desktop mill.

This is a CNC-ready tool which, after several years, still needs stepper motors and a Xylotex PWM driver board. The parts have all been purchased but, due to a number of circumstances relating to health, employment, and locale, have never been installed.

One upgrade I have made since purchase was changing the headstock from the original offering to the new ER 16 spindle equipped version. The ER 16 collets allow anything up to 10mm (3/8") diameter to be installed in the headstock bore, while the threaded nose still allows for other accessories to be added (fly cutter, boring head, etc.)

A set of ER 16 collets was purchased from MariTool. The ER 16 option saves a lot of space between the spindle nose and table when using typical cutters and drills. This makes the whole tool more rigid and reduces vibration in use.

measuring up


Today I spent some time cleaning up the Mitutoyo 10" height gauge obtained last weekend. A little Simple Green cleaner/degreaser and judicious dabs of Autosol polish were employed to get the grunge off.

Too bad I didn't take a "before" picture. It looks pretty good, but could probably stand a little more effort in the various nooks and crannies.

I am fortunate to exist on the periphery of some very talented machinists & toolmakers, one of whom took the time to expertly re-grind the chipped edge of the carbide tip. He noted that the grade of carbide was not what he expected to find on a Mitutoyo; it was much more brittle than other examples he's seen (~30 years in the trade). However, there is now a new, sharp edge on it that will suffice for marking anything I might ask it to.

I have added a small section of flexible tubing over the tip to protect it from future injury while not in use. I should be thankful that the vendor didn't take such good care of this precision instrument himself; the damage allowed me to purchase it at a much reduced price.

EDIT -> I cleaned off my surface plate and tried out the unit - dead on 0.000".

Tuesday 19 November 2013

adding to the tool chest(s)


Actually made it to the Tools of the Trades show. 

In the course of wandering around the aisles, I managed to pick up:
- a Mitutoyo 10” vernier height gauge (needs a replacement carbide wedge)
- what appears to be a century old, single bevel broad axe head (a new handle will be a challenge)
- a beefy 1” corner chisel with a newly (and nicely) fitted handle
- four decent quality moulding planes from different manufacturers marked 6,8,12 and 14.
The 6 and 8 will be modified and matched as a pair (8s), and the 12 and 14 likewise (12s).

Fortuitously, I met up with local moulding plane aficionado Nigel and had yet another great chat about plane refurbishing and use. Nigel and I hit it off during a chance meeting at a tool-buying locale last Spring. His comfy workshop is liberally populated with cool planes he's both made and repaired.

Larry Darbyson from Grandpa’s Treasure Chest was present with his usual selection of good tools at fair prices. Overall, I don't recall ever seeing so many metal planes in the Stanley/Bailey style in one place. Although I really didn't need it, I'm now kicking myself for not picking up the 608 that was sitting under a table mid-room.

I also ran into classmate Rob, a keen hand-tool user I met while attendeding some of Steve DerGarabedian's workshops at Lee Valley Tools.

In general, there was a wide selection of both wood working and metal working tools (mostly measuring and marking devices in the latter case). Prices (as always) varied over a wide range, from reasonable to ridiculous. 

Some specialty wood offerings were available for turners and furniture makers. In contrast to previous events in the same venue, lighting was excellent so there was no need for a flashlight just to look into bins and on shelves.

A must-attend event.

Thursday 14 November 2013

toolish notions

One needs tools, of one form or another, to effect change - to persuade all but the most malleable raw material to assume a more pleasing or useful shape. Tools and their use are what have been claimed to elevate man above the other members of the animal kingdom.

Many a wondrous product or device has been fashioned with few (and often crude) tools. This fact does not stop many of us from accumulating numerous and varied tools purely for the sake of owning, handling, displaying, and/or putting them to use. There is something about applying a well-made tool to a workpiece that generates great satisfaction and a sense of purposeful action.

The semi-annual Tools of the Trades show is happening this weekend; I will likely attend.

Not that I need more tools, of course. But...
I will confess, quite freely, that I am a tool junkie.
Hand tools.
Power tools.
New tools.
Old tools.
Tools for working wood.
Tools for working metal.
Even tools whose purpose is not readily evident; their shape hinting at a use to be discovered.

Digging through the plethora of presented pieces continues to yield the odd tidbit or treasure. A sterling example of a particular version, an approach not seen before, or the missing widget from a partially-functional device already in my possession.

My wish list has grown very short, though. Thanks to good contacts and good fortune, I have already obtained the majority of what I have anticipated needing for the foreseeable future. No doubt other items will be brought to my attention as I progress through various projects.

what have you (intro)

Wood
Plaster
Metal
Plastic
Or what have you.

Doesn't matter the material, something will be made from it.

Big, small.
Indoor, outdoor.
Practical, whimsical.
Any subject (or, indeed, object) is possible.

This effort will primarily be used for my own record keeping and reference.
Perhaps someone else will find certain sections of value.